AUTOMATIC IMPULSE
SEALER INSTRUCTIONS
For Model Numbers TISA-452, 602, 455, 605 & AIE MODELS AIE-300A1, 305A1, 450A1, 455A1, 600A1, 605A1 14", 18" AND 24" MODELS
OPERATING INSTRUCTIONS
1.Set power switch to ON position.
2.Set selector to MAN position for manual operation by pressing the foot pedal switch, or set selector to AUTO position for continuous automatic operation.
3.Adjust the re-cycle time, appropriate to the speed you need for continuous work.
4.Adjust the sealing time (heating time), to the THE LOWEST number on the timer that gives you a strong seal. Too low a number and the seal will easily pull apart. To high a number on the timer and the seal will just melt together instead of sealing. Use trail and error to achieve the lowest heat setting that provides a good seal. 5. Congeal time (also known as dwell time) is the amount of time the seal is allowed to cure under pressure AFTER THE IMPULSE HEAT IS OFF. Generally, this time should be set to 1 to 3 seconds longer than the sealing time.
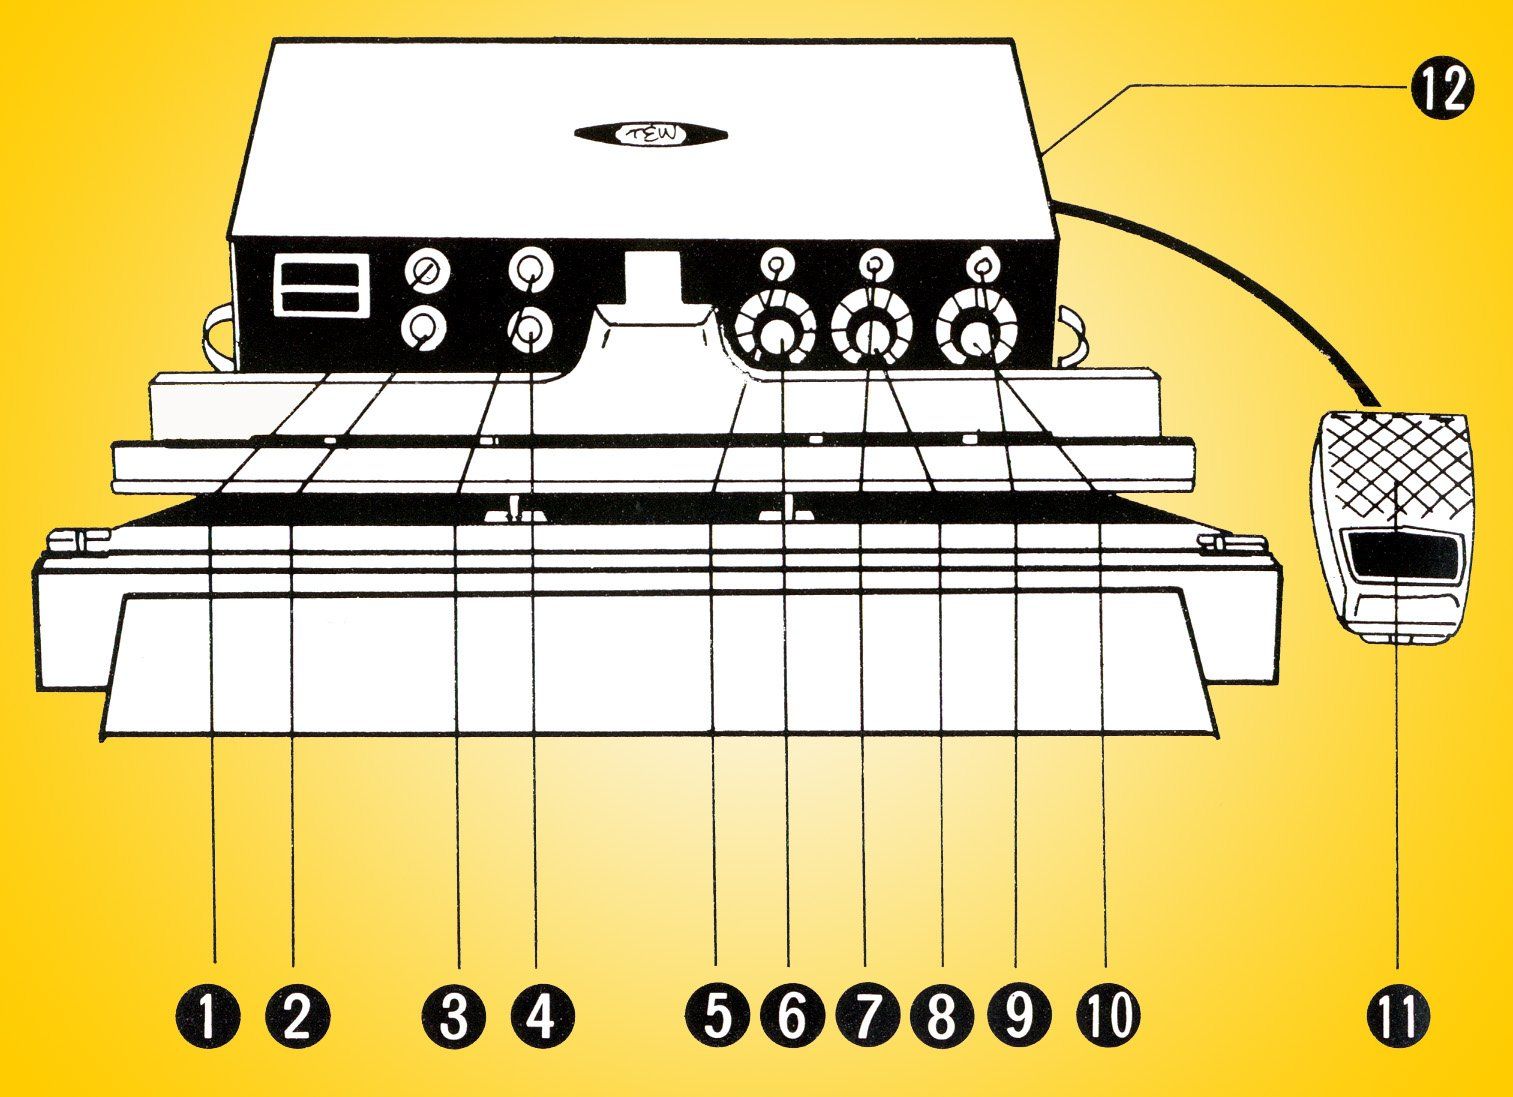
1. Power Indicator Light
2. Power Main Switch AUTO-Action Light
4. AUTO-MANUAL Action Selector
5. Re-Cycle Indicator Light
6. Re-Cycle Timer Control Knob
7. Congealing Dwell Time Indicatir Light
8. Congealing Dwell Timer Control Knob
9. Sealing Light
10. Sealing Timer Control Knob
11. Electric FootSwitch
12. Fuse
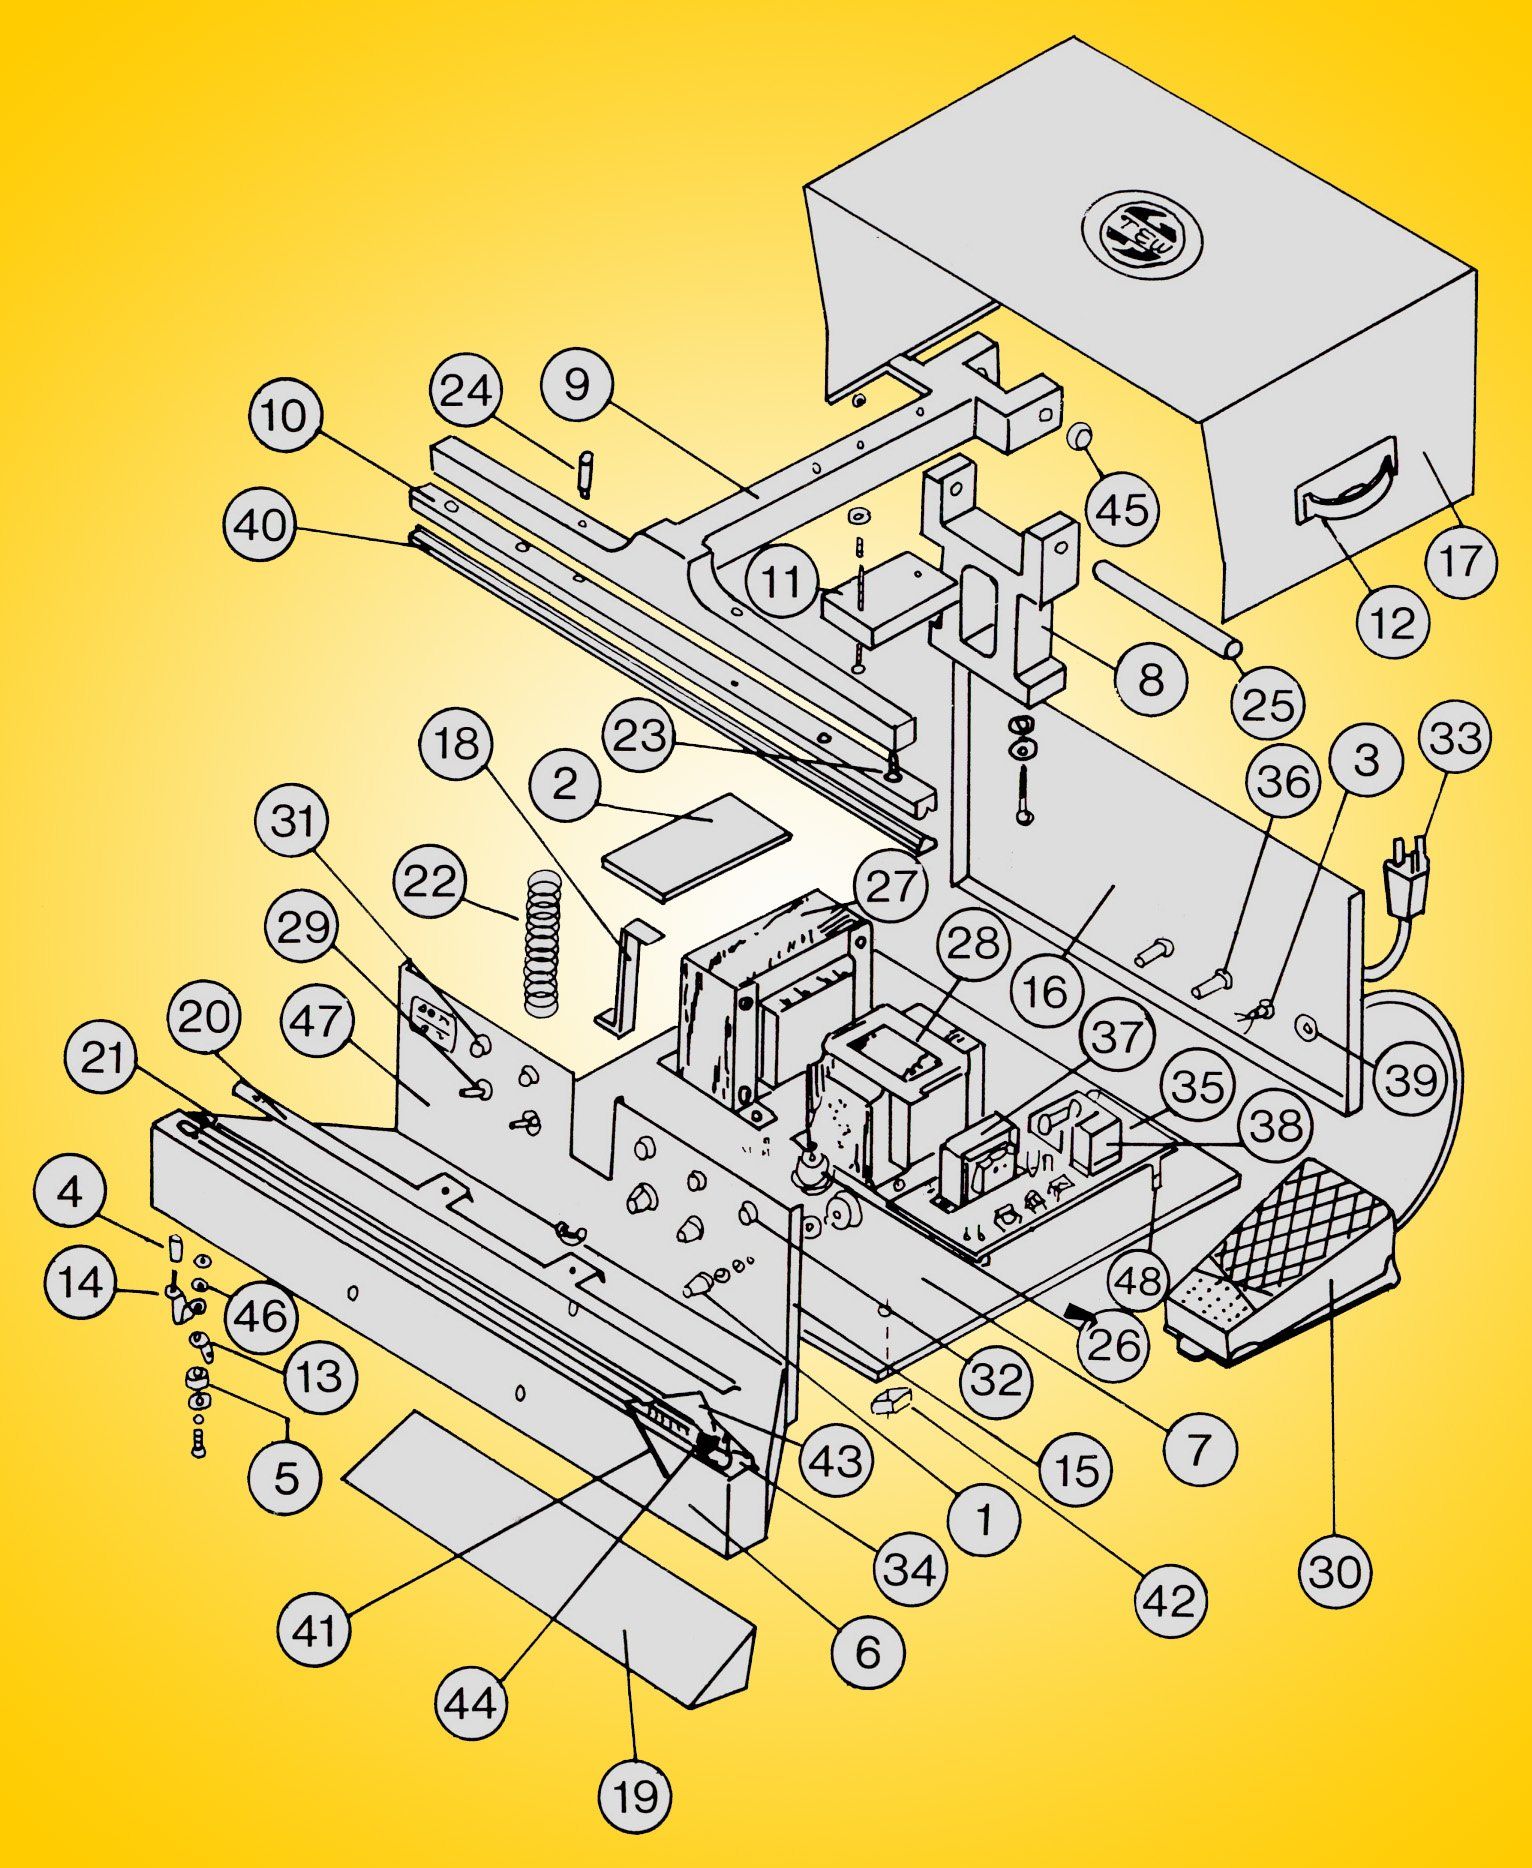
PARTS LIST
- Timer Knob
- Plastic Place
- Bushing
- Bakelite Pipe
- Convex Bakelite
- Lowe Jaw
- Base Plate
- Hinge Bracket
- Upper Jaw
- Upper Jaw Support
11. Flat Plate
12. Handle Strap
13. Brass Contact
14. Tension Spring
15. Front Plate
16. Back Plate
17. Top Cover Plate
18. Spring Lever
19. Operating Board
20. Clip for Cloth
21. Screw for Cloth
22. Return Spring
23. Spring for Upper Jaw
24. Screw for Upper Jaw
25. Hinge Pin
26. Spring Bracket
27. Trams Former
28. Solenoid
29. Toggle Switch
30. Foot Switch
41. Rubber String
42. Rubber Foot
43. Upper Barrier Tape
44. Bottom Barrier Tape
45. Pin Washer
46. Insulation Washer
47. Control Panel
48. PCB Support
31. Signal Light
32. LED Light
33. Power Supper Cord
34. Heating Element
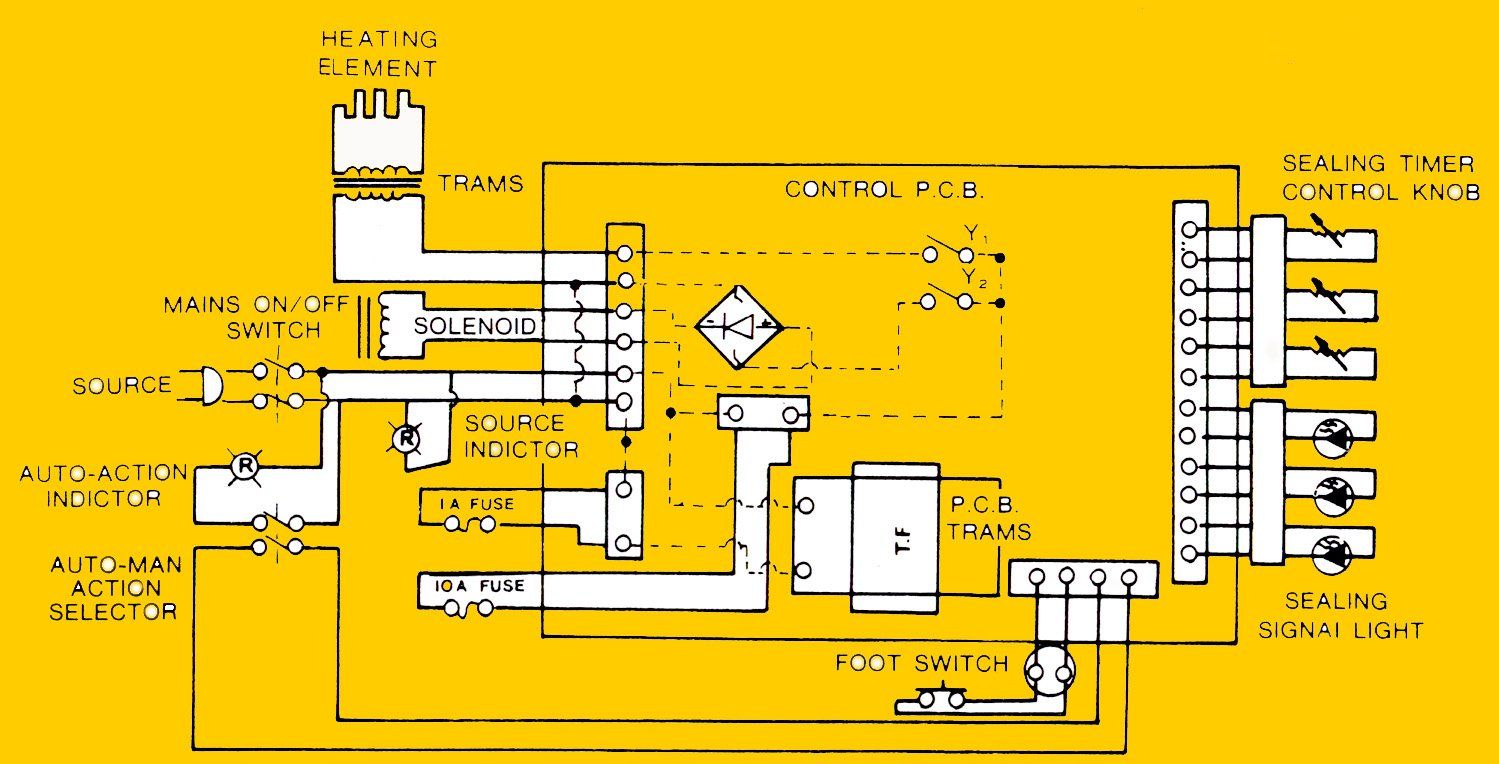
35. Control PCS
36. Fuse Bracket
37. PCB-Trams Former
38. Relay
39. Connector Foot Pedal
40. Rubber Pressure Pad
MAINTENANCE AND CONSUMABLE PART REPLACEMENT
TURN OFF THE POWER BEFORE SERVICING THE SEALER.
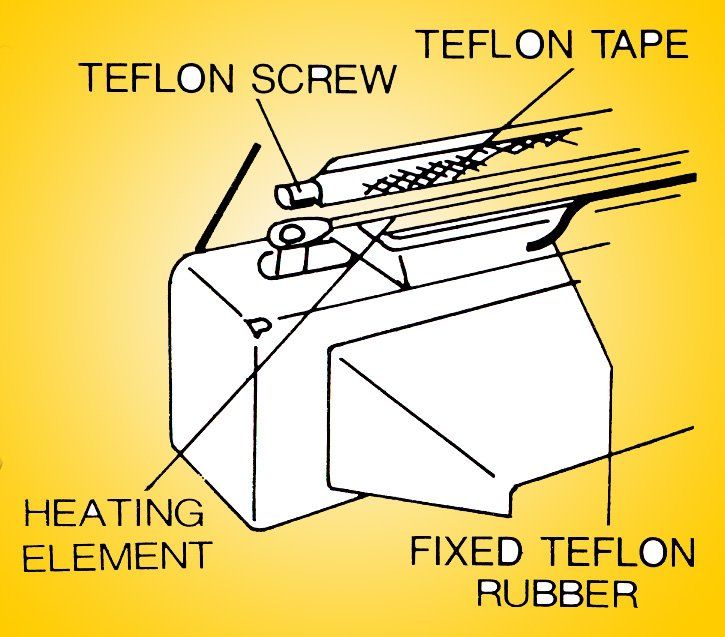
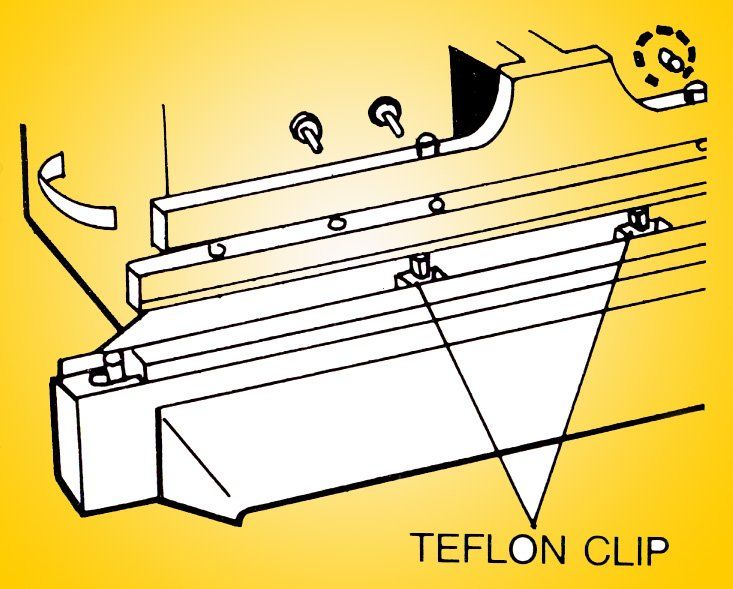
REPLACING THE ELEMENT WIRE
1. Release fixed rubber, or the chrome fabric clip so the Non-stick fabric can be moved, exposing the heating element.
2. Depending upon the model, remove the element wire by slightly moving the element wire spring pin inward toward the middle of the sealer or unscrewing the element wire so it can be lifted off the spring pin..
3. Replace the 1/2" by 10 mil PTFE (Non-Stick Heat Tape piece under the old element wire).
4. After attaching the new element wire, cover tightly with the Non-Stick PTFE fabric (pull out new fabric off the scroll if necessary) keeping pressure on the fabric as you re-tighten the clip or reinsert the black rubber depending upon the sealer model.
ADDITIONAL INFORMATION
Always keep the sealing platform clean.
Particular care should be taken to remove any melted plastic residue from the PTFE non-stick fabric scroll. Do not clean the sealing platform with anything wet.
If the bottom non-stick PTFE Heat Tape, (under the heating element) becomes worn, the heating element may short, and this will damage the element wire.
After a long period of extensive use the condition of the white silicone rubber top pressure pad should be examined for wear. Obviously any deformation will affect the quality of the seal. The white silicone pressure pad is easily replaced. We have them in stock.